Sunday, 13 February 2011

Vanilla Cupcakes with Strawberry Icing and Chocolate Cupcakes

Happy Valentine's Day!


Happy Valentines Day to all my readers :) hope you all get lots of lovely treats and yummy chocs from your special someone.

I am not planning on doing much for Valentines Day this year. Last year as it was our first Valentines Day together we went all out on the presents...but this year we have just paid for our first holiday abroad together so are putting all of our money towards that instead..plus its our official 1 year anniversary next month so we have chosen to celebrate that instead.

We were going to go out for a romantic meal on saturday night to celebrate Valentines but in the end decided we were too poor to! We ended up making curry and naan breads at home and washing it all down with red wine. It was definitely the right decision to stay in...the food was luuurvely!

For a good few weeks I have been planning on making Valentines cupcakes. I couldn't make up my mind which sort to do so in the end I made two batches. The first was vanilla cupcakes topped with candy floss pink butter cream which was strawberry flavoured and then fondant red and pink hearts to decorate. The second batch was chocolate cupcakes with chocolate butter cream and a glittery pink sugar rose to decorate.

I was unsure how the strawberry flavoured butter cream would turn out..having never used flavourings before and only being able to get my hands on supermarket brand flavouring at the last minute, I was pleasantly surprised. The strawberry butter cream combined with the vanilla sponge made a nice change to just plain vanilla butter cream.

I felt a bit let down with my chocolate cupcakes...I have made the recipe before from the Primrose Bakery book and loved it but this time it just didnt turn out the same way as before and for some reason it seemed to spread side ways rather than rise and my cupcakes looked a bit of an odd shape.

Nevermind though... I think with the decorations they do look very cute!


Friday, 11 February 2011

Valentines Day Cake

I signed up for another 10 weeks of cake decorating class in the new year...the first assignment was a Valentines Day cake which had to have a model on it.

My attempt at modelling people was not a great success...although practice does make perfect so fingers crossed I will start to improve soon, so I decided I would do a teddy bear model for my cake.

After the whole chocolate cake and fondant icing fiasco at christmas I decided to go back to the recommended madeira cake recipe to use for the cake. The icing of this cake went surprisingly well - I only had to roll the fondant out twice (compared to the 8 attempts last time!) and it covered the cake (almost) perfectly. I was very very proud of this attempt..my best yet I think!

I'm not much of a madeira cake fan...I prefer a lovely light fluffy cake and I find madeira's rather heavy. The last time I made it I also found it had a very strong eggy flavour..who knows what went wrong but this cake had a much better taste to it and Karl and I enjoyed a slice each after my class this week.


Sunday, 6 February 2011

Blueberry Burst Cupcakes

This is the first recipe I've made out of the Love Bakery cupcake book. This book is well worth a read for all you lovelys out there who like making cupcakes. The book is full of lots of fab recipes from the basic vanilla cupcake to more unusual flavours such as rhubarb and custard.

The sponge of these cakes is plain vanilla - I really liked this recipe for the sponge. It seemed to rise really well and was lovely and fluffy. I will definitely be using this recipe again when I want a batch of vanilla cupcakes.

I then used an apple corer to remove the centre of each cake and filled the cake with a spoonful of blueberry jam. I used St Dalfour's Wild Blueberry jam and it was definitely worth the extra pennies. The jam has a very high fruit content and is not sweetened with additional sugar but with fruit juice.

I then topped the cupcakes with a swirl of vanilla butter cream. The recipe called for cream cheese frosting but I'm always a bit against topping my cakes with this as they don't keep as well. I bought some new Wilton nozzles recently as I had got a little bored with using the same ones. I thought this one would make a nice alternative! I then popped a few blueberries on each cake.


Wednesday, 29 December 2010

Chocolate Orange Cake

I hope everyone had a really lovely Christmas! Karl and I packed our bags and headed down South to spend Christmas with my parents. I had promised my Mum I would make a cake to have as dessert on Christmas Eve. Originally I was going to make a big chocolate cake and ice it properly and make some models for the top...but after the problems I had last time I really didn't need the hassle right before travelling!

In the end I decided to make a Chocolate Orange Cake. This is one of my favourite recipes to make and I'm sure I made it last year for my Mum as well but I jazzed it up a bit this year.

The recipe is out of an old asda magazine that my friend passed onto me. I don't normally like chocolate and orange but for some reason love this cake. The cake is nice and chocolatey and although you can taste the orange its not over powering. The texture of the cake looks like its going to be very heavy but is actually very moist and light. Its also wheat free!


Chocolate and Orange Cake
100g butter
150g plain chocolate
150g ground almonds
finely grated zest of 2 oranges
2tbsp freshly squeezed orange juice
6 large eggs, seperated
100g caster sugar
3tbsp cocoa powder

Preheat the oven to 160C/140C fan/Gas 3. Greased a 23cm round deep cake tin with butter and line the base.
Break the chocolate into squares and put in a bowl with the butter. Stand the bowl over a pan of simmering water and leave until the chocolate and butter have melted. Remove from the pan and set aside for 5 minutes to cool slightly.
Stir in the ground almonds, orange zest and juice and the egg yolks.
Whisk the egg whites until stiff. Add 1tbsp caster sugar and whisk until stiff again. Repeat with the rest of the sugar, whisking after each addition.
Add a quarter of the whisked egg whites to the chocolate mixture and fold in. Then fold in the rest.
Turn into a prepared cake tin and bake for 35-40 mins. Leave to cool in the tin for 15 minutes then turn out on a wire rack to finish cooking. Serve dusted with cocoa powder.
I decorated mine with a little bit of chocolate orange butter cream round the edge of the cake and piped onto the top and then made some sparkly holly leaves out of sugar paste.
It you have a go at making this cake, please be careful when removing the cake from the tin...its so soft and very easy to break!


Sorry for the poor quality of pics...I took them with my new ipod and can't quite get to grips with the touch screen!

Tuesday, 21 December 2010

Christmas Themed Cake

I am a terrible blogger...I cant believe that my last post was the 25th November. Doesnt time fly! Unfortunately, I just have not had the time (or money!) to bake much throughout December.
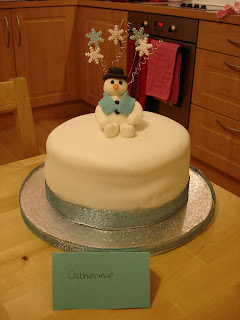
Christmas is almost upon us and as part of my cake class I had to make a Christmas themed cake with a model on the top.

This cake was a teensy bit of a disaster in all honesty!! It was the first cake where I was left completely to my own devices to ice and decorate it. At first I was really excited and had loads of extravagant ideas...which of course all went out of the window after struggling with the fondant icing for hours!

I used a Nigella chocolate cake recipe which I really love but I made the big mistake of trying to ice it the day I made it...well as soon as I tried to level the top the whole cake just crumbled leaving me with an un-level cake! If I had tried to level it out anymore I think I would have ended up with no cake at all...so in the end I had the to make the best out of a bad situation and take Karls advice...prop it up with a bit of chocolate butter cream!!

It sounded ingenious at the time to my stressed out brain until I realised actually how much butter cream it would take to prop it up...nevermind I thought I dont have a choice!

I then put the icing on which that took aaages..I could not get it to roll out properly and by this point was seriously losing my temper with my cake...I really just wanted to throw it in the bin! To top it off by the time I had the fondant on and the snowman the extra weight squished all the butter cream out of the cake which created a bulge around the middle of the cake!!

It wasn't one of my best looking creations but it tasted pretty good and I guess practice makes perfect which is why I've signed up to another 10 cake classes!


Thursday, 25 November 2010

Sugar Roses

Oooo it has been a long time since I last posted hasn't it?! I just don't know where this month has gone. It'll be Christmas before we know it!

A couple of months ago myself and my lovely friend Pauline signed up to a cake decorating class. It has been something that I've been wanting to learn for a while and as the class was only £25 (what a bargain!) we signed up straight away.

The first few weeks were spent learning how to make roses and how to put them together to display on a cake. I then got to ice a cake with fondant icing - something that I have never done before. Below are the piccies...i am so proud of my cake!!


We are now working on decorating a christmas themed cakes so Im sure i will be posting some more piccies in a few weeks :)

Saturday, 6 November 2010

Chocolate and Berry Puddings

Sadly, a few months ago my lovely Gran passed away. She did leave me some money, however. Although I did want to save some of the money, I decided I wanted to buy something special that I could keep and use and remember my Gran by. After much thought and deliberation I decided on buying some products from the Le Creuset range of cookware. My Gran had always been into cooking and baking and I knew she would approve of this purchase and I knew it would be something that I would enjoy using over and over again in my kitchen.

I have always adored Le Creuset and on many an occasion have stopped to gaze over it in my local Debenhams. There were so many different pots and pans to choose from in so many beautiful colours. In the end I went for a cast iron casserole dish, a large pie dish and 4 ramekins in the gorgeous volcanic orange colour.

I found this recipe in the Waitrose magazine a few months ago and thought at the time that this would be the first recipe I'd make to go in my new little ramekins. This recipe was so simple to make and hardly took me anytime at all. The pudding rose perfectly and I loved the combination of the chocolate pudding with the raspberries at the bottom. My Gran would have loved these little puddings too...she always was a chocaholic!!

Chocolate and Berry Puddings

45g butter plus extra for greasing
120g frozen summer fruits (I used all raspberries)
150g plain chocolate, broken into small pieces
75g caster sugar
2 eggs, seperated
1/2 tsp vanilla essence
2 tbsp icing sugar, optional

Preheat oven to 200c
Butter the sides of 4 x 175ml ramekins, divide the berries between them.
Melt the chocolate with the butter in a bowl over a pan of water.
Whisk the sugar and egg yolks with an electric whisk until light and creamy, then stir in the vanilla.
In another bowl whisk the egg whites into soft peaks.
Fold the chocolate mixture into the whisked egg yolks, then fold in the egg whites with a large metal spoon.
Spoon the mixture into the ramekins and bake on a baking sheet for 12-14 minutes until risen but still slightly wobbly. Dust with icing sugar.


(I spread the recipe over the 3 ramekins as mine were of a slightly larger size than the recipe called for. Having now made this recipe I think it would probably work just as well with 4 of my ramekins!)

I really wanted to get a picture of the inside of the puddings and as I ate 2 out of the 3 puddings there was every opportunity to do this. But for some reason I'd tuck into the pudding and completely forget about taking a picture until it was too late and I was on the last spoonful..sorry!